ZV PARENT MASTER 1.3
What is ZV Parent Master?
ZV Parent Master is an animation tool that helps you to animate objects in mutual contact or interaction with ease.
Classic example: a kid grabbing a ball and playing with it. In this situation you need the ability to constrain the ball to his hands and also to animate the ball whenever he lets it go.
If you rely just on the simple parent constraint, sooner or later you’ll realize that this simple task may become a tough job. ZVPM takes care of all the frustrating tasks for you. It will make your life easier!
ZVPM is a tool that has been around since 2007! It’s the tool of choice for many big cg studios and animation schools. Over the years I’ve been improving it, adding features and listening to animator feedbacks. At this point ZVPM has become quite a solid tool. It’s free and it will always be. Give it a try! 🙂
Watch these two videos… I know they’re a bit old but can still give you a good idea of how ZVPM works!
License: Freeware
Help
User interface

Quick start on ZV Parent Master
ZV Parent Master is really easy to use:
- Select the object you want to constrain (generally a rig control), plus the driver object (it can be either a moving or a still object in the scene or a part of the same rig).
- Click the “Attach objects” button. Done!
Starting from the current frame your object will be attached to the parent you choose. Notice how the child follows its parent while still preserving its local animation.
The real fun begins when you start attaching your object to multiple parents! The timeline UI will give you a nice color feedback of all what’s happening, so you’ll never get lost between constraints.
Now let’s go into detail and see how each button works.
1. Attach objects
This is the button you’re going to use the most!
Select the object you want to constrain, plus the driver object and then click this button. Now your object will follow its driver like it was parented to it, until you detach it or attach it to a different object.
For instance you may want to attach a foot to an escalator step, or maybe a hand to a hip… just to give you some ideas.
Well… sounds like ZVPM is working just for IK controls and stuff that has both translation and rotation channels unlocked… Wrong! Since version 1.3 ZVPM can also deal with any other case, e.g. when you need to switch spaces, like “making the head follow neck/torso/world” or “making the FK arm follow clavicle/torso”. So, from now on, there’s no need to have space switching attributes on your rig, ZVPM will take care of that!
2. Detach objects
OK… you are in a situation where from frame t object A is attached to object B. Few frames later you want object B lets object A go and do its own stuff.
Being A the child, this is what you should do: select A (child) plus B (parent) and click the “Detach objects” button. You see now A is not following B anymore.
3. Destroy constraints
This is the button you want to press when you need to get rid of all the constraints ZVPM made on a specific object. To do so, select the child object and click this button.
A popup will appear asking you whether you want to clean up everything and reset the child’s pose (don’t worry, it won’t delete its local animation) or if you want to bake the constraints into the child’s animation on the active time range. In both cases the child object will end up free from any constraints ZVPM previously made.
4. Fix snap
Sooner or later you will run into situations in which, after changing the animation curves of a parent object, you play the scene and notice the child suddenly jumping from one place to another without apparent reason. Don’t panic! This is normal, it can happen. It means you need to tell ZVPM to update the child’s offsets. To do so, go to the frame where you see the jump, select the child object and press this button. After fixing the snap, you’ll have your child object moving again nice and smooth on the scene.
Don’t be afraid to abuse of this button. It’s always safe to press it. ZVPM is smart enough to know if there’s anything that should be fixed.
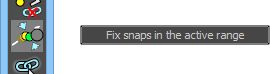
If you right click this button you’ll discover a handy feature that makes ZVPM go through your active animation range and check if there’s any snap to be fixed, eventually fixing them all.
5. Select constraints and snap groups
This button comes handy whenever you want to change the order or re-time your constraints, e.g. you realized you attached a ball to the foot too early or you need character A‘s hand lets character B‘s hand go a few frames later and so on.
To do so, simply select your child object and click this button. This makes you select 2 objects: the constraint node and the snap group (the one that takes care of compensating for the child snaps). Actually… knowing what this button selects for you is not really important… What matters is that now in Maya’s timeline you’ll see appearing some green keys. The green keys you see are placed at the frames where you have an attachment/detachment event.
Feel free to shift-select those keys and move them around to re-time your child’s attachments. Once you’ve done so, I recommend using the “Fix snaps in the active range” function described above to get rid of any jump your changes might have caused.
6. Constraint timeline
You know… Honestly I think this is the coolest feature of ZVPM! 😀
For complex multi-parent animations this timeline is a must have! Go on, select a child and click the “Constraint timeline” button. If the child has any constraints you’ll see a window popping up with the same length as your animation timeline.
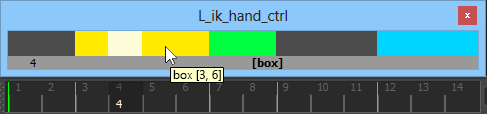
Each color you see in the timeline identifies a parent object. If you go with your mouse over one of the colored blocks, a tooltip will show up telling you which is the parent at those frames and what is the frame range this parent is driving your child object. The grey areas are the frames in which the child is not attached to anything, simply free from any parents.
Keep this window open. This timeline will self-update every time you make a change through ZVPM.
The “Constraint timeline” button has a marking menu that you can open by right-clicking on it.
“Prev” and “Next” allow you to move quickly from one attachment key to another. Just make sure you have your child selected and you are ready to navigate between keyframes.
Making your rig ready for ZV Parent Master
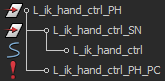
In order for ZVPM to do all its magic, your character rig needs to be properly set up. Luckily this is a quick and painless task. Essentially each control that needs to be ZVPM-ready has to have two groups on top of it. These two groups need to have same transformation matrix and pivot as the control, plus they need to be properly named (this is to avoid any possible user mistake while trying to constrain the wrong control).
ZVPM creates the needed groups for you at the first attachment you perform in your animation. If the control you are using as child is coming from a referenced file, ZVPM won’t be able to create that hierarchy for you and this window will pop-up:
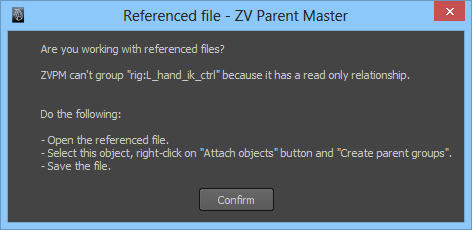
These are the instructions:
- Open the referenced file.
- Select the controls you want to make ZVPM-ready, yeah… all at once is fine.
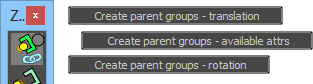
- Right click the “Attach objects” button to show its menu and select “Create parent groups – available attrs” from it.
- Save the file.
This is it! Your controls are now ready to work with ZVPM.
Now you can go back to your animation shot and start attaching controls to anything you want! 😀
Note: if you choose “available attrs” the constraint will be made on all the unlocked translation and rotation attributes. If you want to limit the constrained axes to translations or rotation only, then choose accordingly.
Once you created the first constraint, your control hierarchy will look like this:
You don’t like the suffixes of the parent groups? Feel free to edit the constants you find in the first lines of the .py script. It should be quite straightforward.
OK but... which control should I make ZVPM-ready?
Any control of your rig can be potentially made ZVPM-ready, even the ones that don’t allow translation e.g. all the FK controls, the head control, etc… If ZVPM finds all the translation axes locked, it will constrain just the rotation axes that are keyable. In this way you can for instance make the character’s head follow the orientation of any other part of the body or objects in the set.
Keep in mind that ZVPM will never constrain the axes of the control itself, but will use the ones of the “_PH” group above it, so the control will always be free to have its own animation.
A common practice is to enable it for all the IK controls and the root control first. Then depending on the animation requirements you could think about enabling it for chest, head and fk arms too.